
Mastering the golf swing can be one of the hardest things to achieve in sport.
It looks so simple and obvious on the surface, especially when watching the pros on TV, however it’s actually incredibly tricky to get right.
I’ve seen many great sportspersons – football, basketball, cricket and more – struggle to even make contact or get the ball airborne, proof that natural talent or great hand-eye coordination just doesn’t cut it on its own when picking up the game of golf.
If you’ve being playing for a little while or are brand new to the game altogether, our beginner guide to the golf swing will hopefully get you on a path to grooving a quality swing that will give you enough satisfaction to keep you showing up on course and, in time, see some great results.
In short, developing an effective golf swing, for beginners, consists of several key components:
- Grip
- Stance
- Ball position
- Takeaway
- Backswing
- Downswing
- Follow through
Let’s go through each of these steps in greater detail.
Table of contents
How do you grip the golf club?
The first – and most important – place to start is the grip, as poor habits in how you hold the golf club can lead to real issues later on.
Before we start, there are two terms to understand: strong and weak.
If the grip is weak, it means that you hold the club with the face too open, and this can lead to a right hander missing shots out to the right.
A strong grip will do the opposite, as a closed face sends shots frustratingly to the left.
First step: Grasping the club
The very first move to make when gripping the golf club is to make sure the toe is pointing up into the air, then take your left hand (if you are a right handed player) and shake hands with the golf club.
This action should get the left hand in a fairly neutral position.
From here, place your right hand over the top of the club, with your right thumb overlapping and the right pinky finger resting between the left pointer and middle fingers of the left hand.
Some people will play like this, referred to as the overlapping grip, whilst most golfers will lace the left pointer and right pinky together, referred to as the interlocking grip.
Step two: Check your knuckles
Place the club head down on the ground as if you were lining up a shot, then take a look at your knuckles.
You should see 1-2 knuckles on your left hand; if you see more, your grip is too strong, while no knuckles means it’s quite weak.
On the right hand, take a look at the ‘V’ created by the thumb and pointer finger – if this ‘V’ points up towards your right shoulder, you should have formed a fairly solid and neutral grip.
If all of this sounds too complex, the sure fire way to develop a high quality golf grip is by investing in a grip trainer like this one from SKLZ which has rubber molds that will align your hands in the correct position.
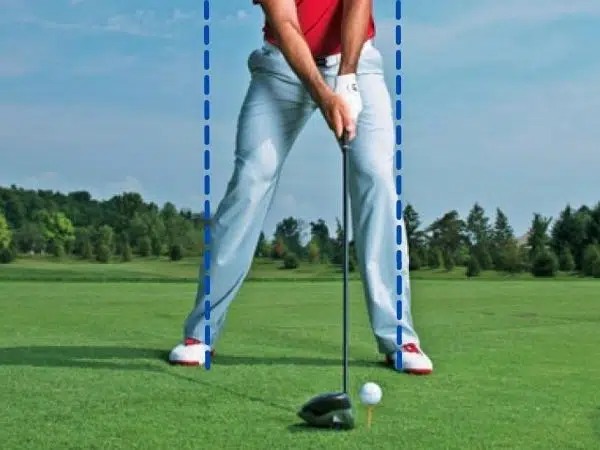
What is the correct golf stance?
There are generally two stances that need to be mastered for the beginner golfer: the driver stance and the stance for pretty much everything else.
For irons, wedges and hybrids, you want to start by distributing your weight about 50-50 between each foot.
The line of your feet, hips and shoulders should more or less point towards your target.
From here, you want to tilt the trail shoulder down a little towards the ground, so that the lead shoulder is higher than the other.
This will create a bit of a ‘reverse K’ shape to the body but it should only be slight (this is far more accentuated with driver).
When your clubhead is rested behind the ball, the butt end of your club should be several inches from your belt buckle – a good unit of measurement is the length from the end of your thumb to the end of your pinky finger when both are outstretched.
Where should the golf ball be positioned?
Ball positioning is one of the easiest things to control in the golf swing, given that it is one of, if not the only, completely controllable and stationary element of the swing.
Ball position for short-to-mid irons
As a general rule, your short irons – think 8 and 9 iron – and wedges should be positioned fairly central in the stance, right between the feet.
As you move into the mid irons – 7, 6 and 5 iron – you should take the ball a little more forward in your stance, maybe a ball to a ball and a half forward of that central position.
Ball position for long irons, hybrids and woods
For longer irons, hybrids and woods, two balls forward of center will help you collect the ball with the shallower angle of attack needed to make these clubs perform.
Keep in mind, you still want to be collecting ball first and taking a slight divot with these longer clubs (the strike isn’t an upward one) but the angle of attack should be ‘less negative’ than mid to short irons and the ball positioning helps this.
Ball position for driver
Now driver is a different story, with the upward swing – utilising a positive attack angle – required to launch the ball high into the air calling for a ball position that is very forward in the stance.
As a guide, the ball should sit on the tee in line with the inside of your left heel (for a right hander).
This forward ball position, in combination with the ‘backwards K’ set up, will help create a positive attack angle and ensure an upward strike, launching driver high into the air.
How do I complete the takeaway properly in golf?
Once we have gripped the club, nailed our set up and determined our ball position, it’s now time to actually start the swing.
Step one: Get to parallel
The first movement, the takeaway, brings the club to a roughly parallel position with the ground, followed by the backswing (which I’ll discuss in a moment).
From your resting position with the clubhead sitting behind the ball, you want to gradually sweep the club along the ground, smoothly moving it into a parallel position.
To do this, your left arm should stay fairly straight, but your right arm will bend a little, along with some hinging of the wrists.
This bending and hinging should be moderate, but enough to help move the club into this position without feeling rigid or constrained.
Step two: Check your club alignment
At the end of the takeaway, the first key thing to look for is the club pointing down the target line, not angling left or right.
For people whose takeaway is performed too far to the ‘outside’, they will see the club shaft draw a line to the left of the target.
This action can be the start of an over the top swing, which is usually linked to a slice.
The opposite issue is a takeaway that is too far to the inside, where the club, at parallel to the ground, is pointing off to the right of the target line.
This can create a swing that is too shallow or ‘inside’ and promote a hook.
The only way to truly determine whether your takeaway is in the correct position is to set up a tripod for a camera or phone like this one and take some footage of your swing.
Step three: Check your clubface
The next part of the takeaway is to be mindful of clubface position at parallel.
If you want to hit the ball straight – or with a slight draw, which is the goal of most golfers – then the club should be in a slightly closed position at this point of the swing.
If it is facing the ground too much, then you’ll likely have a more closed club at contact, causing big hooks.
If your club looks like it is pointing more to the sky, then you may be setting yourself up for an open clubface at impact and misses to the right.
A magnetic clubface rod can be useful in helping to determine where your face is pointing throughout your swing.
Using one of these in practice will help to ensure your clubface is pointing in the right direction at the completion of the takeaway so you can start your swing off correctly.

How do make a backswing and rotate properly in golf?
Once the takeaway has been completed and the club is parallel to the ground, it’s time to move into your backswing to take the club right up to the top before it transitions into the downswing.
If there’s one key point I’d make on how to make the backswing correctly it would be this: the body rotates and the club goes up.
Why rotation is key
Many people take the club upwards towards the top of the swing without rotating the body, and, alternatively, others will rotate the body but take the club around with them, causing a swing that is far to shallow.
In the takeaway, the left knee should have started flexing, and this movement continues as you raise the club into the air.
As you lift the club higher, the knee should keep bending down towards the ball as the hips and shoulders rotate, coiling around the spine.
At the top of the swing, your hips should be pointing right of target at about a 45-degree angle and your shoulders should be about 90 degrees to your target line.
Don’t forget weight transfer
During the backswing, you should feel your weight transfer into the back foot, specifically the inside of the back foot to prevent you swaying off the ball by rolling your weight through the outside of the trail foot.
If you turn correctly and are coming from a solid foundation in the takeaway, then as this coiling happens you want to feel as if your club is lifted upwards, rather than around the body.
What you want to be careful of is taking this as a need to lift the club out and away from your body, which should be avoided as it could lead to an over-the-top swing, causing slices.
As the club raises higher, your trail arm will bend farther and your lead arm will need to bend too.
From here, you can transition into your downswing.

How do you complete the downswing in golf?
The downswing seems straightforward enough: just take the club down to the ball on the shortest path possible and hit it, right?
While many golfers take this approach, unfortunately, it doesn’t always lead to the best result.
Step one: Remove tension
For most amateur and beginner golfers, the mistake they make is to, with stiff arms and body, ‘cast’ the club out and away from the body to hit the ball, rather than feel as if they are loose and limber, collecting the ball on the way through as they complete their swing.
Getting rid of tension and allowing the arms to ‘fall’ into the swing will help you achieve a far better swing.
Step two: Start with your hips
Surprising to many, the first move you want to make in the downswing is firing your hips, or starting to rotate them towards your target.
After this rotation begins, then you can allow the arms to start the downswing.
Step three: Let the club drop
Funnily enough, the sensation you really want to try and feel is to allow the club to drop a little towards the ground from the top of your swing before feeling like you swing it through and at the ball.
This concept is known as shallowing the club, something Sergio Garcia – one of the best proponents of this move – describes as having the sensation of pulling on chain.
For beginners, the main points to consider are the need for hips to rotate before the arms move and to really aim for a tension-free dropping of the club into the slot before worrying about hitting the ball.
How do you nail the follow through in golf?
Unfortunately, a lot of amateur golfers obsess so much over actually hitting the ball that they feel like their job is done as soon as they make contact, failing to release the club through impact and make a good follow through.
It may feel like whatever happens after the ball has been struck has no impact on the flight of the ball itself, but completing a good follow through can help things line up well prior to contact.
Step one: Let the hands release
After impact, the first thing to do is allow the hands and wrist to release, rotating through a little so the toe of the club is pointing skyward when the club roughly reaches a parallel position to the ground.
This thought will help close the club a little through impact so you don’t hit big blocks or slices out to the right.
From here, keep rotating the hips through so that they are like the headlights of a car pointing towards your target.
Step two: Finish high
To finish, allow the club to travel up and over your lead shoulder, resting with minimal tension.
While all of this is happening, your trail foot should lift off the ground and you’ll come up onto your toe, creating the perfect finish as seen on TV.
If you find yourself stuck on the back foot then you’re probably failing to rotate, and a club shaft that doesn’t rest on your shoulder on completion of the swing means you are a little tense and need to try and relax more in your swing.
Final message
The golf swing is one of the most complicated movements in sport, with natural ability or general hand-eye coordination rarely enough to play amazing golf without some knowledge or tutelage of the game.
In this article we have outlined the fundamentals of the golf swing from start to finish, and while there is no quick pathway to the perfect swing, following this step-by-step guide will set you up with a good foundation to work from.
Hopefully it will stop you developing bad habits that many amateurs dedicate their golfing lives to eradicating.
Lewis lives in the UK, with his partner and four kids. He helped rejuvenate ProjectGolfAU with one of his mates, Drew.