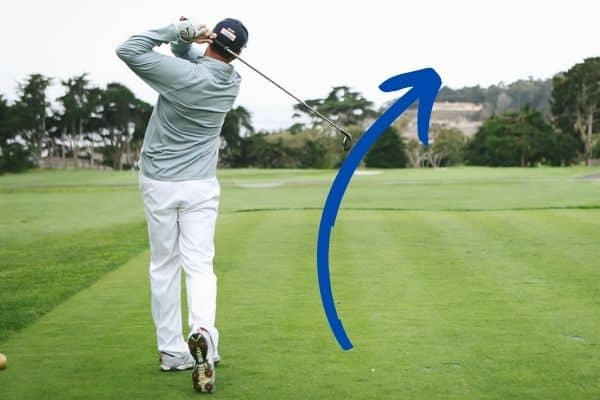
It has been proven that more amateur golfers slice the ball than they do hook, and sadly, a huge slice can be incredibly damaging to your game.
Slicing with driver, in particular, seems to be a foregone conclusion for a lot of golfers as they aim increasingly farther left in order to work with the shot shape, rather than fight against it.
I have seen plenty of golfers employ this strategy to the point where they can barely avoid hitting the trees on the left of the hole in order to hold onto the right rough; if this is you, you have to come to terms with the need to change your swing.
Not only is it an undesirable shot as far as direction goes, but a slice can be high, weak and lack penetration when hitting into any sort of head wind.
Now, I’m definitely not saying that playing a fade is bad – many of the best golfers in the world like Dustin Johnson play a fade with great success – but if your left to right movement is getting too accentuated, then it really is time to make some adjustments.
Fixing a slice in golf can be achieved with the following seven steps:
- Check your grip
- Nail the takeaway
- Watch out for wrist cupping
- Control the clubface through impact
- Time your hip turn
- Fix your club path
- Align your body correctly
This guide is by no means exhaustive, nor will it necessarily be a requirement for you to implement every single change in order to fix your slice.
But by starting at the beginning and working your way through, you will find it a clear, structured way of identifying where the root cause of your slice does lie and how to tackle it.
Table of contents
Step 1: Check your grip
If you are prone to slicing the ball, it’s likely that your grip is too weak, allowing the clubface to open too easily and create a ball flight that slides off to the right.
To check for this, have a look at your left hand first and see if it sits under, rather than on the side of, the grip.
If you can’t really see any knuckles of the left hand, then you need to rotate it more to the right so that you can see two, maybe three of your knuckles.
The crease created by the left thumb and pointer finger should draw a line up to your left shoulder.
Even if you have a neutral left hand, a weak right hand can still be enough to cause a slice.
Your right hand shouldn’t sit too far on top of the club, as this will allow it to rotate clockwise and open the face too easily.
With your right hand, you want to aim for a position where the right thumb and index figure create a V that points up towards your right shoulder.
Ultimately, you should feel like there is a somewhat even amount of rotation in your wrists when twisting them to both the left and right.
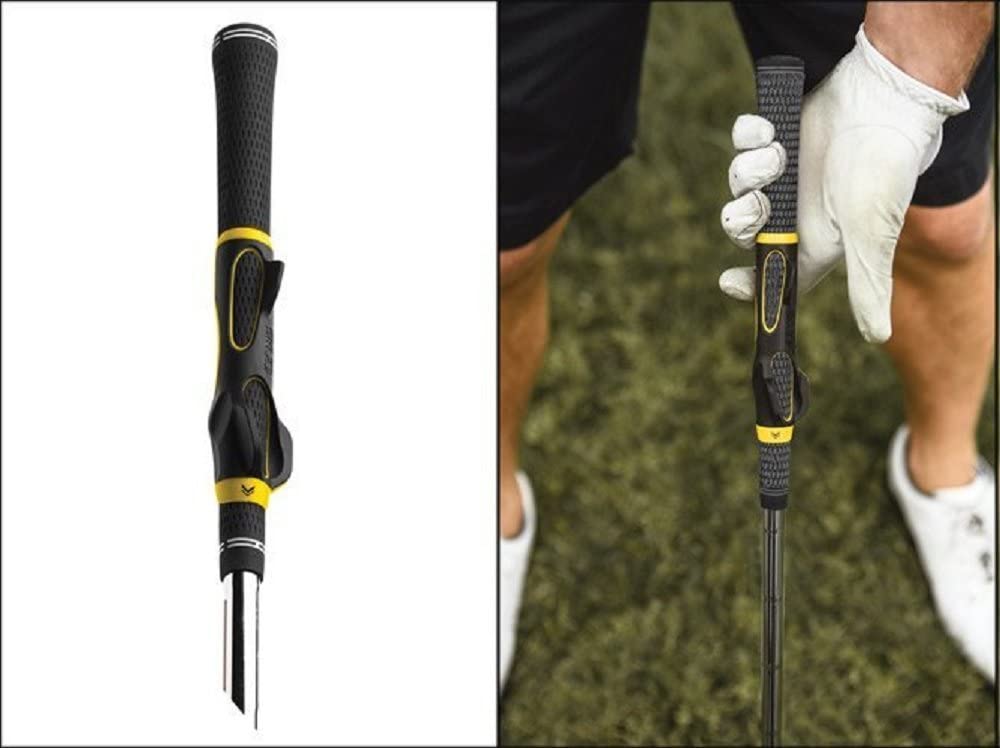
If all of this still feels a bit too confusing, a sure-fire way to get that perfectly neutral grip every time is through using one of the numerous grip trainers on the market.
We like this one from SKLZ that attaches to your grip and has rubber ridges that will guide where your hands should sit.
While it is great for making a few practice swings prior to a round or working things out on the range, just remember that it is illegal to game it when playing an actual competition round.
Step 2: Nail the takeaway
If you are confident that your grip is set in a fairly neutral position – or even slightly strong – yet those painful slices persist, then it is time to turn your attention to the takeaway.
The takeaway is only a small movement where you draw the clubhead away from the ball to a position parallel with the ground, but bad habits here can have a dire impact on the rest of your swing.
Ideally, when the club reaches a position parallel to the ground, the butt end of your club should be pointing towards your target.
If it points to the left, then you are shaping up for an over-the-top swing path, something likely to lead to a slice.
The best way to determine where your club sits is by filming a few swings in slow motion using a simple tripod for your phone, otherwise you risk thinking you are in the right position, but your feeling is actually far from reality.
Alignment sticks can be really helpful in this instance and can be put to great use on the range with the following drill.
The perfect takeaway drill
Point the alignment stick to your target along the ground and make a few small swings where you take the club back to parallel and pause.
Use the alignment stick to determine where the butt of your club is pointing, and if it is off to the left, then you need to work the clubhead more to the inside so that it lines up.
Even if your shaft is parallel to target in the takeaway, you could still be allowing the club to rotate too far open so that it points to the sky.
Despite your grip being potentially correct, active wrists can still override a neutral grasp of the club.
A magnetic alignment rod can give a great visual indication of when your club is open or closed and help you to diagnose this swing flaw.
If it does creep into your swing, focus on completing your takeaway with a neutral, if not slightly closed clubface to try and promote more of a draw flight.
Step 3: Watch out for wrist cupping
A lot of discussion seems to be had around bend in the wrist, with a big push coming about on tour for a bowed wrist to deloft the club and help compress the ball.
However, if you are someone battling a slice, there’s a good chance you are actually doing the exact opposite.
A cupped wrist occurs when the back of the hand bends backwards towards the forearm, which sets the club in a more open-faced position.
If, at the top of your swing, you have cupping of the wrist occurring, it is probably a contributing factor in your tendency to slice the ball.
What you need to do is aim for a more neutral wrist position where the back of the hand and forearm make a fairly straight line at the top of your swing.
Can a bowed wrist stop me slicing in golf?
You may want to trial a slightly bowed wrist where the palm of your hand actually works back a little towards the inside of your forearm, helping to close the clubhead and promote more of a draw.
Without filming a few swings this is going to be tricky to diagnose, but there are training aids out there on the market that can help remove the pressure on the ‘feel’ element to changing your swing, setting your wrist in the right position to develop muscle memory.
This Swing Correction Wrist Band from Yosoo slips comfortably over the wrist and will get you finding that perfect position when hitting a few balls on the range.

Step 4: Control the clubface through impact
If you’ve made all of these changes yet still find you are slicing balls off to the right, then you might need to turn your attention to face control.
If we get everything right in the backswing and transition to the downswing successfully, our wrists are still able to take over through impact and manipulate the clubface in an undesirable manner.
For some reason, many golfers have a real fear of releasing the club, allowing it to roll over and work around the body in the follow through.
It most likely comes about because of a poor concept of how to get the ball going straight, feeling as if they need to send the clubface towards the target in a square position, which is ultimately just going to lead to a slice.
By extending the arms and club out in front of the body, you increase the chance of adding a cutting spin to the ball, making it fly in a left-to-right manner.
The arms separate to allow this to happen, in what’s known as a ‘chicken wing‘, and the result is a poorly controlled swing.
The feeling to aim for here is that the right forearm rolls over the top of the left one, and this will help to close the clubface through impact for a straighter shot, maybe even a draw.
You do, however, need to be careful of wrist roll as it could lead to too much closing of the clubface and hooks, but a gentle roll of the forearms is going to help to straighten out your ball flight.
There are also plenty of arm bands on the market that can slip over the forearms and be used for practice, and this greater connection between the arms will force you to release the club in a more appropriate way.
Step 5: Time your hip turn
Timing your hip turn is another element to the slicing puzzle, with a (very) general rule to go by being that a late hip release will send the ball left, and an early hip release will send the ball right.
This can be particularly evident in golfers that hit a block slice – a ball flight where the ball starts right, then continues to go farther right as it travels.
If the hips fire and open too early, the club isn’t given enough time to catch up in the swing and square off the clubface.
What this creates is an open clubface at impact, sending the ball out to the right with slicing cut spin.
A simple drill here is to slip an alignment stick into your belt holes, using it to monitor the openness of your hips.
If you make a few slow practice swings and find that the alignment stick is facing left of your target early in the downswing, you’re probably releasing the hips way too early and need to marry them up better with your arms.
Step 6: Fix your club path
If you’re a slicer of the ball, then it’s extremely likely that you have path-related issues, specifically an over-the-top swing.
If, in your takeaway, you draw the club back to a position angling away from your body, it really primes you to lift it up into a very steep position in your backswing.
Now, this can actually be mitigated – American star Matthew Wolff is a great, but rare, example – yet most people don’t perform the necessary shallowing of the club to fix this swing flaw.
What usually happens is the arms are casted out away from the body and the clubhead makes contact with the ball on an out-to-in path, imparting slicing spin on the ball and sending it sailing out into the right trees.
The over-the-top action is one of the most common in amateur golfers, and luckily it isn’t too hard to fix once you understand the concept.
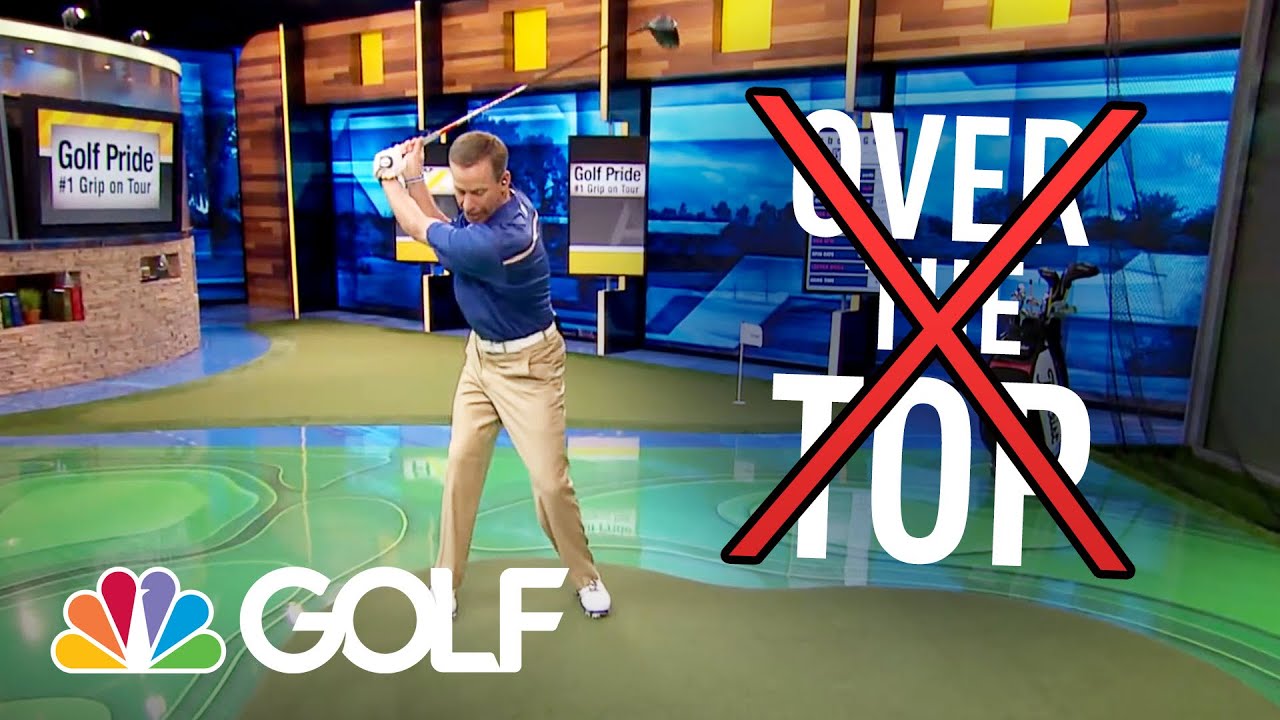
How to correct an over-the-top swing
Diagnosing an over-the-top move is probably going to require some slow-motion footage or help from a pro/friend, but if you’re a die hard golf fanatic then forking out for a launch monitor like the FlightScope Mevo+ will give you phenomenal data about the path of your club.
While it’s pricey, it will give you years of feedback that could transform your golf swing.
Ultimately, you need to train yourself to come at the ball more from the inside, and a headcover or alignment stick is all you need to make this happen.
Place a headcover or angled alignment stick about a foot behind the ball and slightly off to the right.
If you make a few slow, natural swings, you’ll probably find that the clubhead makes contact with the headcover as you get down near to the ball.
Your aim is, at the top of your swing, to try and redirect your path so that it drops in the slot and comes more from inside the target line, so that your clubhead will sneak inside the headcover and meet the ball square.
If you’re able to harness this move with a square clubface, a straight ball flight or slight draw is far more likely than a slice.
Step 7: Align your body correctly
If you’ve been a slicer for months, maybe even years, then it’s pretty likely that you’ve gradually started aiming farther and farther left over time to try and counteract the path of your slice.
As your slice seems to grow and grow in ferociousness, it no doubt feels like it’s nearly impossible to squeeze the ball inside the left trees and still find the right side of the fairway.
The reason for this is that aiming left can actually promote a slice, rather than alleviate it, given that aiming left can just encourage an out-to-in path that cuts across the ball.
Hopefully by now simple changes including grip and wrist position have tamed the slice considerably, so it’s time to begin aiming correctly to help bring about a straighter ball flight.
A simple way to align yourself
In order to aim square to your target, pick a small object like a leaf or tuft of grass that sits a few inches in front of your ball on your target line.
Line up the clubface with the object, then take your stance so that your feet and shoulders are parallel to your target line.
For people who battle a slice, closing the shoulders off ever so slightly can help to fight a left-to-right ball flight a little, too.
Now, you obviously can’t take an alignment stick out on course, but practicing with one on the range is a must to really set this alignment into your muscle memory.
If the slicing creeps back into your game, avoid the temptation to start lining up to the left once more and go back to the fundamentals in order to tame that undesirable shot shape.
Final message
Slicing the ball is one of the biggest issues amateur golfers face, and it can be an incredibly frustrating thing to try and remove from your game.
Thankfully, the fix for some people can be as simple as a grip change, yet for others that slicing shot shape can be a little more persistent.
By working through our checklist and trying to implement these gradual swing changes, you leave yourself well-poised to find that elusive high draw that may have once been a mere feature of your dreams.
Lewis lives in the UK, with his partner and four kids. He helped rejuvenate ProjectGolfAU with one of his mates, Drew.